Tuesday, June 21, 2011

Short on time and need a treat???

Today the sun FINALLY made a long overdue appearance!  We were having some friends over so as soon as the boys were asleep I went out to mow the lawn, and by the time I got back in I only had an hour until our friends were here and no snack ready.  I wanted something summery seeing as it was the first day of summer (and our first day of sun in over a week), so I "pinterested" (the new googled) summer treat and I found a brilliant, quick, cute idea!

Here is my version!

CRAZY easy, and quick to make...
1.  Cut your ice cream sandwiches in half
2. Roll in sprinkles
3. place in the freezer until you are ready to eat!

Sunday, June 19, 2011

Peanut Butter Goodness

If you like chocolate and peanut butter, do I ever have a treat for you (cough cough AMBER hahaha).
I made this dessert for our father's day supper, and it got great reviews!

Start by making a batch of brownies, you can use your own fav, or mine.

Here is the line-up for your topping...

Start by mixing together 1/2 marg, 1 package of cream cheese, and a cup of PB.

Next add 1 cup of icing sugar...it doesn't look that different but the texture and taste sure is!

In a separate bowl whip your cream (250mL), and add 1/4cup sugar, and 1tsp vanilla.

Then fold your whipped cream into your PB mixture...when I tasted this I actually said "wow" outloud!

Once your brownies have cooled, add the PB topping, and garnish with cut up Reese PB cups (I used 2 king sized bars...but I did quality control test some of them :))

I took a piece out to get a picture, but before I knew it, it was gone, so this is what ya get!

Not quite sure what this should be called...if you have a suggestion leave it as a comment!

Saturday, June 18, 2011

Ruffle Camera Strap Cover

I carry my camera around with me almost everywhere...and I really wanted it to be pretty!
Soooo.....I made a ruffled camera strap! You know how I love ruffles :)

Start by cutting out your pieces...
you need 1 long piece for you ruffle!
you need 2 shorter pieces for your base (measure the length of your strap and add 1/2", and then measure the width and add 1/2")

Set your stitch length to the longest possible, and stitch from one end to the other (no backstitching)...

I used two different coloured threads so that this part would hopefully be easier to see...
Hold onto the bottom thread and pull the fabric into a ruffle!

Keep going until your entire piece is ruffled.  I usually pull from one end until half is ruffled, and then turn it around and pull from the other end to do the other half.

Pin your ruffled piece to one of the base pieces, make sure to tuck the unfinished ends underneath.

Next, take your two base pieces, pin your good sides to the middle and sew together...
pinned...

sewn...

when you take the pins out and unfold it, it should look like this...

Next you fold the unfinished ends and sew them...

Last step!!!  Pin the other two sides together and sew it up!

Flip it out and you have this beautiful cover...

Add a flower...

How perfect will this look on my camera!!!

Friday, June 17, 2011

Real Party Feature - BARBIE PARTY

One of my great friends put together and AMAZING barbie party for her daughter's 3rd birthday.  It was unreal!  Here are some pictures...

The super yummy cupcakes with adorable toppers!

The dessert eating room (I am sure she had a better name for it than that, hahaha).  How fun for the kiddos to walk into this room with the perfect little tables, stunning "chandeliers", and personalized place settings!

Some more decor!

Silver Corvettes for "Barbie's boys"

A little bling for the Barbie Girls!

Who wouldn't want to party in here?!?!?!

How sweet is the silhouette art, she made it herself!

The beautiful birthday girl ready to party!

Some more of the details!

We ALL loved this party!  WAY TO GO CHRISTIE, you threw an AMAZING party!

If anyone else has an awesome party that would like to be featured send me your info and pictures!

digital clipart supplied by "The giving madam"

Thursday, June 16, 2011

How to make a taggie!

Sorry it as been SO long since I last posted.  I have been in a bit of a slump...I will do my best to pick it up a little bit :)

One of my little fellas LOVES taggies, so I figured that I better learn to make them before he wears the ones that he has out!

I was able to make this project using things that I already had!
I picked two fabrics that I love (one flannel, and the other one was a minky, each cut to a 13"x13" square), and a variety of ribbons that coordinated with the fabrics that I used.

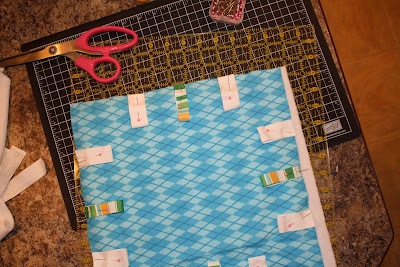
I started by pinning the ribbons to the good side of one of the fabrics, it is hard to see but they are in loops.

Then I pinned the good sides together...

sewed around the outside leaving just a small opening...

a pic of the opening, ha!

Then I flipped it the right way and went around one more time to make it look prettier, and to seal the hole!

all finished!

This project was WAY easier than I thought that it would be.  It would be a great project for someone just learning to sew, and any little guy/gal would love this as a gift!

Be sure to check back in the next couple of days for a feature on an AMAZING barbie party!

Related Posts Plugin for WordPress, Blogger...