Wednesday, February 23, 2011

Jewellery Cubby Organization

When we built our current house our plan was to live in it for about a year or so and then build again, so our small ensuite was not a major concern...it was just going to be a year or two.  Well along came our boys and they kind of put a hold on our plans to move again...so we are still dealing with the small ensuite.  Without a doubt the most unorganized space in the ensuite is my jewellery cubby, I usually wear the same pieces over and over because they are on the top of the pile and easiest to grab.  Here is what it looked like before...


I went to Canadian Tire and picked up a pack of these hooks for about $3.00...


 I took everything out of the cubby and started screwing the hooks into the wall and hanging stuff on them.  The hooks were surprisingly easy to screw into the wall and in no time at all I was done the bracelets, rings and earings side...


The necklace side was a little tougher because I had to use my weak little left hand to put the screws in, but I did manage and this is how it looks...


Obviously not everything can be hung so there are still some things that need to be on the shelf.  I LOVE how it turned out, I open the door to look at it everytime I am in the ensuite!  Here is the after, best $3 I ever spent!!!


Monday, February 14, 2011

Valentines Day Cupcakes!

I have no pictures of the making of these cupcakes...they were made while the fellas were still up.  The boys LOVE the kitchenaid as much as I do...seriously! But they are not big fans of me stopping to take pictures!

Anyways here is the final product, and yes I used the sprinkle medley AGAIN!!!  I can't get enough of it!  I did add another type of sprinkle into the mix though so it is not the EXACT same!!!


All the cupcakes, yummy!  This batch is heading over to the school that I taught at before the boys were born!
 And for all you cupcake lovers out there if you don't have this cupcake carrier you NEED to find one!!! It holds 36 cupcakes and it is the same size as the wilton one that only holds 12!!!  I found mine at Costco awhile back but I know that you can get them on amazon!

Saturday, February 12, 2011

Sam's Sesame Street Second Birthday Party!

My friend Mandi hosted a Sesame Street themed party today for her son Sam's second birthday, so much fun!  I have some of the pictures to post but if you would like to see the full rundown of the party click here to visit her blog!

The guests were greeted with this PERFECT sign on the door! {notice the attention to detail...the SAM in seSAMe street are outlined black...perfect!}

The adorable birthday boy sporting some new shades...thank goodness he got these because when we first got there he spent a good 5 minutes trying to get mr.potato head's glasses on! hahaha

This party was brought to you by the number 2 and the letter S...so cute!

Mandi also went to a TON of work organizing a bunch of different stations!  Thank goodness she is a teacher and enlisted her students to make these awesome signs!  There were 5 stations in total.  The first one was BIG BIRD'S BOOKS, complete with elmo beanbag chair and Sesame Street books.  She also used the foam letters and numbers from the floor mat to decorate...genuis!!!
 
 Next was ERNIE'S RUBBER DUCKY TUB, as you can see this station was a hit!

OSCAR'S TRASH TOSS - perfect for making sure that all the wrapping paper gets cleaned up quickly!!!

There was also a ME LOVES COOKIES! station that was a very simple pin-the-tail-on-the-donkey style game and ELMO LOVES HIS CRAYON AND PLAYDOH TOO , which had colouring sheets that Mandi had printed off the Sesame Street website which is amazing if your kids are into SS.  Because there were so many fun activities happening I barely even noticed that there were 15 kiddos there!!! 

{funny little side note - I got to Mandi's just a little bit early to help with some last minute stuff.  I said something about there being 15 kids coming and her sister said "oh, I thought there was only going to be 13, I guess 2 more doesn't make that big of a difference", if this doesn't sound funny maybe you don't know that I am the mother of 17.5 month old triplets....and let me tell you 2 more definitely DOES make a difference!!!}

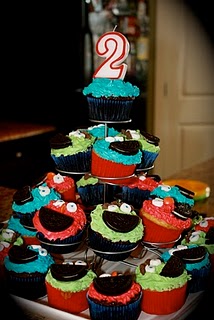
The cupcake tower...
 Close up on one of my favs!

Some more decorations and treats...


Custom waterbottles to go with the theme!

And as everyone left the party they got a wonderful Sesame street book, and a bag of sugar cookies in the shapes of S's and 2's!
 

The party went SO smoothly thanks to all of Mandi's hard work prepping and planning!  Our family was glad that we got to be a part of Sam's special day!

...and one other cute thing that we forgot to get pictures of was the labels for the food...a little detail that adds a big punch!


Friday, February 11, 2011

Chocolate Carmel Pretzel Rods

  I have always been a fan of the salty-sweet combo..and other french fry into frosty dippers out there??? Because of this love for the salty-sweet, these little devils have VERY quickly become a favorite of mine.

The supplies...
 Start by unwrapping your carmels...
 throw them in the microwave with a splash of water for 30 second intervals, stirring at each break...mine looked like this after the first time...
 and then this after I stirred them the second time...perfect!

I started dipping right away...I was worried the carmel was going to get hard and that it would not re-heat nicely.  Anyways my first one out looked like this...
 and this was the last one (which I think was better because it ended up having a little more carmel on it)...so lesson learned, no need to hurry!!! (both were super delish though)
 Let them sit for about 30 minutes and then get your dipping chocolate ready.  Follow the same process as melting the carmels.  I have no pictures of this process because it is always a rush to get the sprinkles on before the chocolate hardens...and you all know how seriously I take sprinkles!!!  Because I was so in love with the sprinkle medley from the brownies...i used it again!

anyways here they are... 
mmmm 
 so cute!

also if you have dipping chocolate leftover, dump it onto a sheet of parchment and you can break it up and use it again!!!

I did not include any amounts because it really depends on how many you want to make!  Also I have not been able to find the pretzel rods ANYWHERE in Canada, these ones came from a friend who got them in a gift basket and knew how desperate I was for them...so if anyone know where to get them let me know!

Thursday, February 10, 2011

Another way to say I heart you...

This is yet another idea that I found on pinterest!  I am seriously addicted!

Anyways here are the supplies that you need...some embroidery thread, a needle, a marshmallow, a small scrap of paper and an edible writer (I picked mine up from Michaels...right with all the cake decorating stuff!).
 Start by drawing an adorable little heart on your marshmallow...or whatever you want to draw/write!

Knot one end of the thread, and then stick it through the top lefthand corner (good side up)...

then wet the needle and stick it down through the top of the marshmallow...

then tie a knot in the string at the bottom of the marshmallow.

all thats left to do now it write on the tag...I am sure you can be more creative then me!!!

Here is one that I made for John's hot chocolate tonight!

Have fun with it!

Wednesday, February 9, 2011

Brownie Sundae!

I did it...A post without cream cheese!!!  Anyways, after the boys went to bed Johnny was craving a sweet treat so I decided to make him a brownie sundae!

Here is the line up for the brownies!
 Start by preheating your oven to 350.  Then begin melting 3/4 cup of margarine with 4 squares of unsweetened chocolate.
 mmmm...chocolaty goodness!
 Once it is all melted together you whisk in your three eggs (beat them together first).  Make sure that you start whisking BEFORE you add the eggs so that they don't cook!!!  It will go a little lumpy, but keep whisking and it will smooth out!  This picture is at the lumpy stage.

Once it is smooth, mix in 2 cups of sugar.

and 1 cup of flour

then pour your batter into a greased 9x9 pan, and put it in the oven for about 27 minutes.

Once it is in the oven you can start thinking about sprinkle selection!!! (I know I am such a geek)  I decided to make a valentines day sprinkle medley using the following three...

 This picture is not great but I LOVE how they all look together!

a few minutes later (thats right the sprinkle selection took awhile!) your brownies will be ready to come out of the oven!

Now for the chocolate glaze.  Put 1/4 cup margarine and 4 squares of semi-sweet chocolate into a microwave safe container.  Put it in the microwave for 45 seconds and then take it out to stir.  Continue in 30 second intervals after the first one...mine only took one more time!

Pour the glaze onto the brownies (they do not have to be cool), spread it out, and then sprinkle!!!  This picture seriously does not do them justice...I think I am going to need a macro lens asap!

Top with some ice cream and chocolate sauce and you have yourself a brownie sundae!!!

Related Posts Plugin for WordPress, Blogger...